

Exploring the Dynamics 365 ERP MCP Server: Tools, Use-cases, Setup, and Agent Integration
In a previous blog post, I explained what an MCP server is and how it differs from traditional APIs. In this blog post, I will be introducing you to the preview version of Dynamics 365 ERP MCP Server and step-by step guide to deploy it.
The Dynamics 365 ERP MCP Server delivers powerful capabilities designed to streamline intelligent agent development and integration:
- Seamless interoperability with MCP-supported platforms, including Copilot Studio, GitHub in Visual Studio Code, and Claude Desktop, enabling cohesive development experiences.
- Enhanced agent intelligence through deeper contextual awareness, with access to knowledge, actions, and tools from Dynamics 365 Finance and Operations.
- Faster time to value by allowing customers and partners to rapidly develop MCP-compliant agents that autonomously execute business processes — all with minimal dependency on APIs or complex integrations.
- Robust security and consistency, ensuring agents are properly authenticated and authorized when accessing Dynamics 365 Finance and Operations, while leveraging enterprise-grade governance and security controls.
The preview version of Dynamics 365 ERP MCP Server is shipped with the following tools:
| Tool name | Description | Type |
| findapprovedvendors | Finds vendors that are approved to supply specific items. The request can include item number and vendor account number as filters. | Retrieve/Search |
| findrequisitions | Finds open purchase requisitions, with an option to filter by approval status. Set ‘approvedOnly’ to true to return only approved requisitions, or false to include all open requisitions regardless of approval. | Retrieve/Search |
| releasepurchaserequisitionlines | Releases the specified purchase requisition lines and creates purchase orders for them. A default vendor account number can be provided for lines that do not have a vendor assigned. Each line must be specified in the format: [{ “requisitionnumber”: “REQ0001”, “requisitionlinenumber”: 1 }]. | Action |
| findinventory | Finds the available inventory for a given item number. Site ID and warehouse ID can be left blank to include all locations. | Retrieve/Search |
| createtransferorderforsingleitem | Creates a transfer order for the specified item. Requires item number, from warehouse ID, to warehouse ID, and quantity. | Action |
| findpurchasetradeagreements | Finds the most favorable purchase trade agreements based on item number, quantity, vendor, and expected purchase date. | Retrieve/Search |
| findreleasedproducts | Finds released products using a keyword that matches either the product name or product number. Returns a list of released products that match the search term. | Retrieve/Search |
| findinvoiceoverview | Get vendor invoice context | Retrieve/Search |
| findinvoicematchstatus | Check vendor invoice match status | Retrieve/Search |
| matchinvoice | Match vendor invoice with product receipt | Action |
| notifyresponsibleemployee | Send notification to vendor responsible employee | Send message |
| findunmatchedinvoices | Get unmatched vendor invoices | Retrieve/Search |
| submittoworkflow | Submit invoice to workflow | Action |
Use-cases
Here are a few practical use cases demonstrating how agents can utilize these tools effectively:
1. Autonomous Purchase Requisition to Purchase Order Flow
Scenario: A procurement assistant agent receives a request for a specific item.
Steps using MCP Tools:
findapprovedvendors→ Find all approved vendors for the item.findrequisitions→ Retrieve open, approved requisitions for the item.releasepurchaserequisitionlines→ Release requisition lines and generate purchase orders.
Business Value: Reduces cycle time and human bottlenecks in PO generation by automating the triage and release process.
2. Intelligent Inventory Rebalancing Agent
Scenario: An inventory agent is triggered when stock falls below threshold in a warehouse.
Steps:
findinventory→ Get current stock across all warehouses.createtransferorderforsingleitem→ Create a transfer order from high-stock to low-stock location.
Business Value: Optimizes inventory utilization across warehouses automatically, avoiding stockouts.
3. Autonomous Invoice Matching Agent
Scenario: An AI finance assistant identifies unmatched invoices and attempts to resolve them.
Steps:
findunmatchedinvoices→ Get list of problematic invoices.findinvoiceoverview+findinvoicematchstatus→ Get invoice context and matching details.matchinvoice→ Attempt auto-matching with the correct product receipt.submittoworkflow→ If successful, submit for approval.notifyresponsibleemployee→ If failed, notify the assigned person.
Business Value: Speeds up the invoice lifecycle, reduces manual errors, and improves financial compliance.
4. Vendor Negotiation Advisor Copilot
Scenario: Before placing an order, the agent finds the most favorable vendor terms for a specific item.
Steps:
findreleasedproducts→ Verify the product exists.findapprovedvendors→ List approved vendors for the item.findpurchasetradeagreements→ Compare trade agreements for pricing, quantity discounts, and validity dates.
Business Value: Enhances procurement decisions with real-time, AI-driven vendor evaluation.
5. Smart Requisition Follow-up Agent
Scenario: A Copilot assistant is asked to find out the status of recent requisitions and notify stakeholders.
Steps:
findrequisitions→ Get recent or pending requisitions.notifyresponsibleemployee→ Alert employees if action is needed (e.g., vendor assignment, approval).
Business Value: Keeps requisition processes on track by nudging responsible teams via AI automation.
6. Vendor Performance Analysis Agent
Scenario: Evaluate vendor reliability based on fulfillment and invoicing consistency.
Steps:
findinvoiceoverview→ Gather historical invoicing data.findinvoicematchstatus→ Analyze invoice-product receipt match frequency.findunmatchedinvoices→ Identify vendors with recurring issues.
Business Value: Enables data-driven decisions on vendor renewal or delisting.
These scenarios show how the MCP Server acts like a modular, API-exposed intelligence layer, allowing Copilot or other AI agents to orchestrate end-to-end processes—transforming ERP from a passive system into an active, decision-making participant in business operations.
A Step-by-Step guide to deploy the D365 ERP MCP Server
This comprehensive step-by-step guide is intended to assist you in getting started and navigating the tools outlined above.
Please note: The Dynamics 365 ERP MCP Server is currently in preview and available only in preview environments. If you’re interested in exploring its capabilities, follow the instructions outlined below.
Prerequisites
Before you begin, ensure you have the following:
- Appropriate permissions in the Power Platform Admin Center to create environments
- A license for one of the following:
- Dynamics 365 Finance
- Dynamics 365 Supply Chain Management
- Dynamics 365 Project Operations
- Microsoft Copilot Studio license
- Install Power Platform CLI and install latest updates
Step 1: Create an Environment
In this step, we will utilize the Unified Admin experience and provision a developer-focused D365 Finance and Operations sandbox environment using PowerShell.
- Open your PowerShell console application as an Administrator and run the following commands to generate the environment.
- Install the module:
Install-Module -Name Microsoft.PowerApps.Administration.PowerShell- Create a session against the Power Platform API:
Write-Host "Creating a session against the Power Platform API"Add-PowerAppsAccount -Endpoint prod
- Construct the JSON object to pass in:
$jsonObject= @"
{
 "PostProvisioningPackages":
 [
 {
 "applicationUniqueName": "msdyn_FinanceAndOperationsProvisioningAppAnchor",
"parameters": "DevToolsEnabled=true|DemoDataEnabled=true"
 }
 ]
}
"@ | ConvertFrom-Json

Kick off new environment provisionment:
Execute the following command in the same PowerShell Console to create a D365 Finance and SCM Sandbox environment in the preview region.
New-AdminPowerAppEnvironment -DisplayName "<<Environment Name>>" -EnvironmentSku Sandbox -Templates "D365_FinOps_Finance" -TemplateMetadata $jsonObject -LocationName "unitedstatesfirstrelease" -ProvisionDatabase
Note: You need to pass Location as unitedstatesfirstrelease and provide a friendly name for your environment. In the above example, the Finance environment template is used. Depending on the license in your tenant, change the template ID in the above PowerShell command.
| License | Template name | Template ID | Comments |
| Dynamics 365 Finance | Finance (preview) | D365_FinOps_Finance | |
| Dynamics 365 Supply Chain Management (preview) | Supply Chain Management (preview) | D365_FinOps_SCM | |
| Dynamics 365 Project Operations | Project Operations Integrated (preview) | D365_FinOps_ProjOps | |
| Dynamics 365 Operations Application Partner Sandbox | Project Operations Integrated (preview) | D365_FinOps_ProjOps | |
| Dynamics 365 Commerce | Commerce (preview) | D365_FinOps_Commerce | This template is available only for trials. |
If you encounter an error that indicates scripts is disabled then execute the following command in Powershell to provide the required permissions:
Set-ExecutionPolicy -Scope CurrentUser -ExecutionPolicy RemoteSigned -Force
Import-Module Microsoft.PowerApps.Administration.PowerShell -Force

- Wait for the environment to be ready: It will take around 2 hours for the environment to be ready. You can log in to the Power Platform admin center to track the progress of the deployment. While the deployment is in progress, the State of the environment will be displayed as “Preparing” and once the deployment is completed, the State will be updated to “Ready”.

- Check the environment: Once the environment is ready, select the environment and open the Finance and Operations URL to check if you are able to access everything in the environment.

- Update the Company for the Admin user: On the top search bar, enter “Users” and select the Users form in System Administration. Update the Company for the Admin user to USMF. It is assumed that the connection to this environment will be established with the Admin user. If you are planning to use some other environment, then update the default company for that user.

Step 2: Ensure the Latest PowerAIExtensions Solution is Installed
You might need to update the version of the Microsoft Dynamics 365 – PowerAIExtensions solution in the environment if the version is earlier than 1.0.1.773.
- Sign in to the Power Platform admin center.
- Go to Environments and open your environment.
- On the command bar, select Resources > Dynamics 365 Apps.

4. Next to Microsoft Dynamics 365 – PowerAIExtensions, if there’s an Update available link, select it and update the solution.

Step 3: Create a Dataverse Connection for the MCP Configuration
The D365 MCP Server leverages the Dataverse connection to connect to the environment. Follow the steps below to add a new Dataverse connection.
- Go to Power Automate. If necessary, change to the correct environment by selecting it from the top right.
- Select Connections on the left navigation pane (If you didn’t find it then select More), and then select + New connection on the command bar.
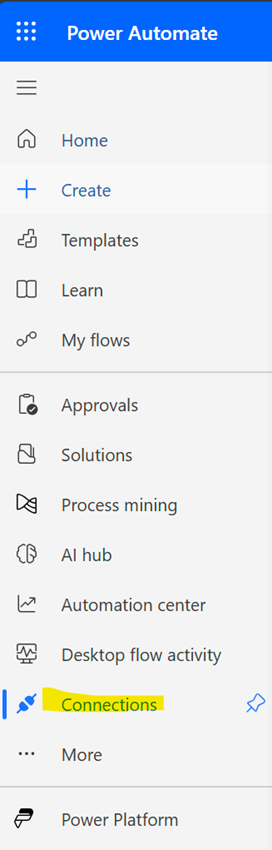
3. Type Dataverse in the search box, and then select the green-colored Microsoft Dataverse connector.

4. Complete the instructions on your screen to establish the connection.
Step 4: Use Dynamics 365 ERP MCP Server in Microsoft Copilot Studio
The steps below detail how to add Dynamics 365 ERP MCP Server.
- Go to Copilot Studio and select your environment from the top right environment selector.

- From the left navigation pane, select Agents > + New agent.

- Write the prompt: “Create a Supply Chain Management AI Agent to streamline and optimize end-to-end procurement, inventory, and supplier operations.”
- Copilot will suggest a name for your agent. If you don’t like it, you can provide your desired agent name.
- Set the instructions: “Monitor inventory levels and optimize procurement process”.

- Select Create.

- Scroll down to the Tools section and select Add tool.

- Select Model Context Protocol, which will list all the available MCP Servers, and then select Dynamics 365 ERP MCP.
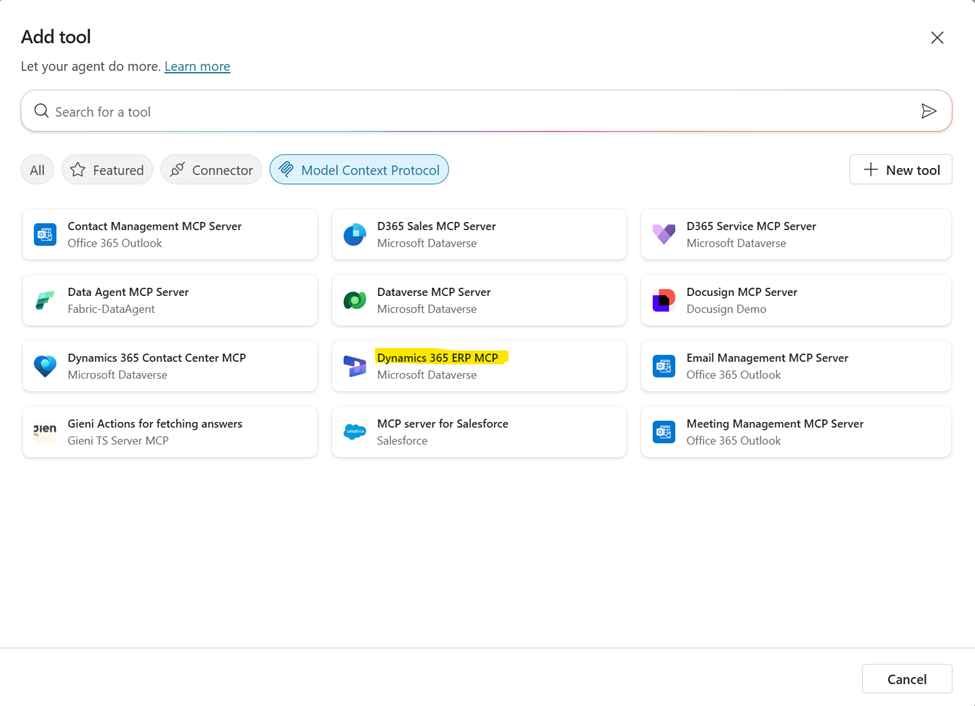
- If you haven’t yet created a Dataverse connection, you’re prompted to do so.
- Select Add and configure.

- View the individual tools available on this MCP server by selecting Tools in the left pane. A brief description of each of the available tools is listed.

Congratulations! You have successfully added the Dynamics 365 ERP MCP Server to your Agent, and your agent is ready.
Step 5: Testing the Agent
You can now interact with the Dynamics 365 ERP MCP Server tool directly through the ‘Test your agent’ chat pane and observe its activity within the Activity Map. Copilot Studio’s Activity Map offers a visual breakdown of the plan generation process.
During testing, the Activity Map offers a clear visualization of how the MCP Server and its tools are triggered. In this example, I asked, ‘What is the item name for item number 1002,’ and the Activity Map intelligently shows that the Dynamics 365 ERP MCP Server identified the need to invoke the findreleasedproducts tool to respond. It also displays the corresponding inputs and output responses, providing transparency into the agent’s reasoning process.

Try asking questions like the ones below and observe how the MCP Server intelligently triggers the appropriate tools during its search for answers or execution of actions:
- What is the total available inventory for item number 1000?
- What is the most cost-effective way to purchase 100 units of item 1000, and which vendor provides the best option?
- Create a transfer order for item 1000 to move 10 units from warehouse 11 to warehouse 12.“
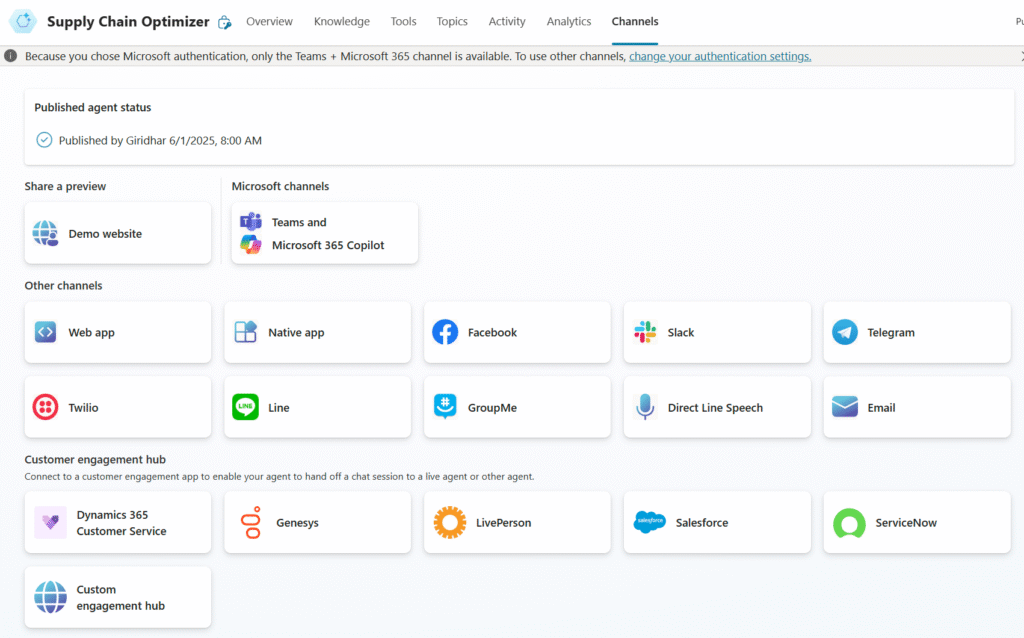
Step 6: Publishing the Agent
- Click the Publish button in the top navigation bar.

- Once published, go to Channels to deploy your agent into one of the supported channels:
Let me know how would you use this MCP server.


One Comment